AWS Sagemaker Blog

Machine Learning for Financial Services and Trading Strategies

0%

cover-image-001

The previous chapter AWS DevOps+Q Agile Delivery of 16 Leadership Principles for the Financial Services Industry shared how AWS DevOps pipelines can solve pain points in the financial services industry, and utilize the Amazon 16 Leadership Principles.

In this chapter, you will learn how to build an AWS DevOps pipeline:

AWS DevOps

AWS Services Description
IAM Identity and Access Management
EC2 Cloud-computing platform
Elastic IP address Static IPv4 address designed for dynamic cloud computing
Route53 Cloud domain name system (DNS) service
CodeDeploy Automate application deployments to Amazon EC2 instances
GitHub Actions Easy to automate all your software workflows
Pricing Calculator Create an estimate for the cost of your use

2.0 AWS DevOps Pipeline

2.1 Pre-requisites

2.1.1 Knowledge Pre-requirements

  • Create an EC2 server
  • Have a GitHub account and know basic Github Actions.
  • Know how to setup NGINX
  • Know basic AWS services, including EC2, CodeDepoly, IAM.

2.1.2 Project Requirements

First upload a simple static web project codedeploy.nginx.001 on Github, which includes:

Object Location
index.html ./ Static Web Page
ic_alana_002_20241022_a.jpg ./icons images on a static web page
appspec.yml ./ CodeDeploy code
application-stop.sh
before-install.sh
after-install.sh
application-start.sh
validate-service.sh
./scripts CodeDeploy code
appspec.yml ./github/workflows CodeDeploy code

Also, GitHub access tokens are needed to configure codeDeploy permissions.

GitHub access tokens

Github -> Setting -> Developer Setting -> Tokens. Add a GitHub access token.

2.2 Creating IAM Roles

A good naming style is important because as the number of IAM roles grows, it can be confusing for developers.

1
2
AmazonSageMaker-ExecutionRole-20240805T101031
AmazonSagemakerCanvasBedrockRole-20240801T140683

{service}-{role}-{datetime}-{version}. AWS Bedrock and SageMaker auto-generated IAM naming style.

1
2
3
AWSCodeDeployService-EC2AccessCodeDeployRole-20241024T000000
AWSCodeDeployService-DepolyEC2Role-20241024T000000
AWSCodeDeployService-GitAssumeRoleWithAction-20241024T000000

This is the clear IAM naming style, so we will create three IAM roles for EC2, CodeDeploy, and GitHub Actions, respectively, following this official IAM naming style.

2.2.1 AWSCodeDeployService-EC2AccessCodeDeployRole-20241024T000000

AWSCodeDeployService-EC2AccessCodeDeployRole-img001Select EC2 on Use Case Tab。

1
2
3
4
5
6
AmazonEC2FullAccess
AmazonEC2RoleforAWSCodeDeploy
AmazonS3FullAccess
AmazonSSMManagedInstanceCore
AWSCodeDeployFullAccess
AWSCodeDeployRole

Add AmazonEC2, AmazonS3, and AWSCodeDeploy permissions.

2.2.2 AWSCodeDeployService-DepolyEC2Role-20241024T00000

AWSCodeDeployService-DepolyEC2Role-img001Select CodeDeploy on Use Case Tab.

1
2
AWSCodeDeployFullAccess
AWSCodeDeployRole

Add AWSCodeDeploy permissions.

2.2.3 AWSCodeDeployService-GitAssumeRoleWithAction-20241024T000000

AWSCodeDeployService-GitAssumeRoleWithAction-img001Select Access management -> Identity providers -> Add provider.

AWSCodeDeployService-DepolyEC2Role-img002Used to listen to GitHub Actions.
Provider URL: token.actions.githubusercontent.com
Audience: sts.amazonaws.com
The GitHub Identity Provider then adds the AWSCodeDeployService-GitAssumeRoleWithAction-20241024T000000 role.

AWSCodeDeployService-DepolyEC2Role-img003AWSCodeDeployService-DepolyEC2Role-img004Select Assign Role -> Web identity -> GitHub organization.

1
2
AmazonS3FullAccess
AWSCodeDeployFullAccess

Add S3, AWSCodeDeploy permissions.

2.3 Create Amazon EC2

Create-EC2-img001Create-EC2-img002

  1. Fill in the name ec2.cheaper.001
  2. Click Amazon Linux 2023 AMI
  3. Click t3a.nano

Finally, click Launch instance to create EC2.

2.3.1 Associate Elastic IP address

Associate-Elastic-IP-address-img001

  1. Click on Elastic IPs
  2. Click the Allocate Elastic IP Address button

Associate-Elastic-IP-address-img002

  1. Select the name ec2.paper.001 where EC2 has just been created
  2. Select the default Private IP address
  3. Click the Associate button

2.3.2 Amazon Route 53

Amazon-Route-53-img001

  1. Fill in the sub-domain name
  2. Fill in the EC2’s Private IP address
  3. Click the save button

Successfully set up the static sub-domain name and IP address.

2.3.3 Add AWS IAM roles

Add-AWS-IAM-roles-img001

  1. Select Actions
  2. Select Security
  3. Select Modify IAM role

Add-AWS-IAM-roles-img002Add AWSCodeDeployService-EC2AccessCodeDeployRole-20241024T000000.

2.3.4 Install CodeDeploy Agent on Amazon EC2

Enter the Amazon EC2 terminal.
CodeDeploy-Agent-on-Amazon-EC2-img001CodeDeploy-Agent-on-Amazon-EC2-img002

  1. Select Connect button
  2. Select EC2 Instance Connect tab
  3. Select Connect button

CodeDeploy-Agent-on-Amazon-EC2-img002Successfully log into the Amazon EC2 terminal.

1
2
3
4
5
6
7
sudo apt update
sudo yum install ruby
sudo apt install wget
cd /home/ec2-user
wget https://aws-codedeploy-us-east-2.s3.us-east-2.amazonaws.com/latest/instal
chmod +x ./install
sudo ./install auto

Install CodeDeploy Agent

CodeDeploy-Agent-on-Amazon-EC2-img003Success, CodeDeploy Agent is running.

2.3.5 (Optional) Install Git on Amazon EC2

1
2
3
4
5
sudo yum install git-all
git clone https://{YOUR_GITHUB_SECRET_ID}@github.com/{YOUR_GITHUB_ORGANIZATION_NAME}/{YOUR_GITHUB_PROJECT_NAME}.git
git checkout .
git pull origin main
sudo chmod 777 -R PATH

Install git and pull the project to Amazon EC2.

2.3.6 (Optional) Install NGINX

1
2
3
4
sudo yum update
sudo yum install nginx -y
sudo service nginx start
sudo service nginx status

Install NGINX

1
sudo netstat -tunpl

Show Amazon EC2 listening ports. At this moment NGINX is on port :80.
The default home page of NGINX is in /var/www/html/index.html.

Amazon-EC2-rules-img001Amazon-EC2-rules-img002Ensure that Source and Destination are publicly accessible, set to 0.0.0.0/0.

2.3.7 Appspec.yml

Reference Articles:

Appspec.yml is used to indicate the codeDeploy procedure code.
Deployment is divided into 5 steps: (1) BeforeInstall -> (2) BeforeInstall -> (3) AfterInstall -> (4) ApplicationStart -> (5) ValidateService.

In the root directory, add ./appspec.yml.

1
2
3
4
5
6
7
8
9
10
11
12
13
14
15
16
17
18
19
20
21
22
23
24
25
26
version: 0.0
os: linux
files:
- source: /
destination: /usr/share/nginx/html
hooks:
ApplicationStop:
- location: scripts/application-stop.sh
timeout: 300
runas: root
BeforeInstall:
- location: scripts/before-install.sh
timeout: 300
runas: root
AfterInstall:
- location: scripts/after-install.sh
timeout: 300
runas: root
ApplicationStart:
- location: scripts/application-start.sh
timeout: 300
runas: root
ValidateService:
- location: scripts/validate-service.sh
timeout: 300
runas: root
  • Source is the root directory of the GitHub project.
  • Destination is the project pulled into Amazon EC2.

In addition, a new ./scripts folder, in which there are 5 xxxxxxxx.sh respectively.

1
2
3
4
5
application-stop.sh
before-install.sh
after-install.sh
application-start.sh
validate-service.sh

There are 5 xxxxxxxx.sh in there, which are the 5 steps of codeDeploy.

(1) application-stop.sh

1
#!/bin/bash

Empty. There is no need to stop the application in this tutorial.

(2) before-install.sh

1
#!/bin/bash

Empty. There is no need to stop the application in this tutorial.

(3) after-install.sh

1
2
3
4
#!/bin/bash

sudo yum update
sudo yum install nginx -y

Install NGINX

(4) application-start.sh

1
2
3
#!/bin/bash

sudo service nginx start

restart NGINX

(5) validate-service.sh

1
#!/bin/bash

Empty. There is no need to stop the application in this tutorial.

2.3.8 Static Website Pages

Added ./icons folder, which shows the site image ic_alana_002_20241022_a.jpg.

Also, added index.html home page.

1
2
3
4
5
6
7
8
9
10
11
12
13
14
15
16
17
18
19
20
<html lang="en" data-bs-theme="dark">
<head>
<meta charset="UTF-8">
<meta name="viewport" content="width=device-width, initial-scale=1.0, user-scalable=no">
<script src="https://cdnjs.cloudflare.com/ajax/libs/bootstrap/5.3.3/js/bootstrap.min.js" integrity="sha512-ykZ1QQr0Jy/4ZkvKuqWn4iF3lqPZyij9iRv6sGqLRdTPkY69YX6+7wvVGmsdBbiIfN/8OdsI7HABjvEok6ZopQ==" crossorigin="anonymous" referrerpolicy="no-referrer"></script>
<link rel="stylesheet" href="https://cdnjs.cloudflare.com/ajax/libs/bootstrap/5.3.3/css/bootstrap.min.css" integrity="sha512-jnSuA4Ss2PkkikSOLtYs8BlYIeeIK1h99ty4YfvRPAlzr377vr3CXDb7sb7eEEBYjDtcYj+AjBH3FLv5uSJuXg==" crossorigin="anonymous" referrerpolicy="no-referrer" />
<title>Alana Lam</title>
</head>
<body>
<div class="container">
<div class="row">
<div class="col-12 mt-4 text-center">
<h1>CodeDeploy + Github Actions + EC2</h1>
<img src="./icons/ic_alana_002_20241022_a.jpg" class="mt-4 rounded-circle" alt="Alana Lam" width="200" height="200">
<h5 class="mt-4">Alana Lam (AWS Builder Community Manager, Hong Kong)</h5>
</div>
</div>
</div>
</body>
<html>

A simple static site with text and images.

If you have completed “2.3.5 Install GIT” and “2.3.6 Install NGINX”, you can type EC2 EIP or the domain name in your browser, to see the Static Website Pages.

2.4 Create AWS CodeDeploy

2.4.1 Create the AWS CodeDeploy application

AWS-CodeDeploy-Application-img001

  1. Fill in the application name test.codeDeploy.001
  2. Select EC2/On-premises
  3. Select Create application button

2.4.2 Create AWS CodeDeploy Deployment Group

AWS-CodeDeploy-Deployment-Group-img001

  1. Select Create deployment group button

AWS-CodeDeploy-Deployment-Group-img002

  1. Fill in the Deployment group name test.deploymentGroup.001
  2. Select the IAM role, AWSCodeDeployService-DepolyEC2Role-20241024T000000
  3. Remove Enable load balancing, because this is the simplest DevOps pipeline case, so there is no need for additional AWS services

2.4.3 Create AWS CodeDeploy Deployment

AWS-CodeDeploy-Deployment-img001Go to test.deploymentGroup.001
AWS-CodeDeploy-Deployment-img002 Select Create deployment button
AWS-CodeDeploy-Deployment-img003AWS-CodeDeploy-Deployment-img004First, Select My application is stored in GitHub

  1. Fill GitHub token name
  2. Fill in the Repository name, codedeploy.nginx.001
  3. Fill in Commit ID
  4. Select Create deployment button

2.4.4 Successful run of AWS CodeDeploy

Successful-run-of-AWS-CodeDeploy-img001Successfully run AWS codeDeploy

2.5 Create GitHub Actions

Reference Articles:

2.5.1 Create GitHub Actions workflow

Create-GitHub-Actions-workflow-img001Create-GitHub-Actions-workflow-img002Create-GitHub-Actions-workflow-img003

  1. Click New workflow button
  2. Select set up a workflow yourself link
  3. After writing the GitHub Actions command, click the Commit changes button

2.5.2 Configurate GitHub Actions secrets and variables

GitHub-Actions-secrets-and-variables-img001

  1. Select Settings Tab
  2. Select Secrets and variables -> Actions Tab
  3. Select Secrets Tab

2.5.3 Add GitHub Actions secrets variables

GitHub-Actions-secrets-and-variables-img002

  1. Add a new secrets variable with name IAMROLE_GITHUB_ARN
  2. The value is the ARN of the IAM role arn:aws:iam::{xxxxxxxxx}:role/AWSCodeDeployService-GitAssumeRoleWithAction-20241024T000000
  3. Click the Add secret button

2.5.4 Add GitHub Actions variables

GitHub-Actions-secrets-and-variables-img003

  1. Select Variables Tab
  2. Add four of Actions Variables
  3. Select New repository variable button
Variables Name Value Description
AWS_REGION us-east-1 The default region is US East (N. Virginia)
CODEDEPLOY_APPLICATION_NAME test.codeDeploy.001 2.4.1 Create the AWS CodeDeploy application
CODEDEPLOY_DEPLOYMENT_GROUP_NAME test.deploymentGroup.001 2.4.2 Create AWS CodeDeploy Deployment Group
IAMROLE_GITHUB_SESSION_NAME AWSGitAssumeRoleWithAction 2.2.3 AWSCodeDeployService-GitAssumeRoleWithAction-20241024T000000

2.5.5 Write GitHub Actions Code

.github/workflows/main.yml

1
2
3
4
5
6
7
8
9
10
11
12
13
14
15
16
17
18
19
20
21
22
23
24
25
name: Deploy

on:
workflow_dispatch: {}

jobs:
deploy:
runs-on: ubuntu-latest
environment: Prod
permissions:
id-token: write
contents: read
steps:
- name: Git clone the repository
uses: actions/checkout@v2

- name: Configure AWS credentials
uses: aws-actions/configure-aws-credentials@v4
with:
role-to-assume: ${{ secrets.IAMROLE_GITHUB_ARN }}
role-session-name: ${{ vars.IAMROLE_GITHUB_SESSION_NAME }}
aws-region: ${{ vars.AWS_REGION }}
- run: |
commit_hash=`git rev-parse HEAD`
aws deploy create-deployment --application-name ${{ vars.CODEDEPLOY_APPLICATION_NAME }} --deployment-group-name ${{ vars.CODEDEPLOY_DEPLOYMENT_GROUP_NAME }} --github-location repository=${{ github.repository }},commitId=${{ github.sha }} --ignore-application-stop-failures

A basic version of the GitHub Actions Code.

2.5.6 Run GitHub Actions Code

GitHub-Actions-Code-img001

  1. Select Actions Tab
  2. Select Deploy Tab
  3. Select Run workflow button

2.5.7 Successfully running GitHub Actions

GitHub-Actions-Code-img002GitHub-Actions-Code-img003GitHub-Actions-Code-img004Successfully ran main.yml

4.0 Cost

Plan USD
Monthly cost $11.83
Total 12 months cost $141.96

Overall, AWS’s prices are quite competitive. The most important thing is that CodeDeploy is cheap, and the cost of using Amazon EC2 t4g.nano is very low, so AWS is a low-cost + efficient cloud service provider.

4.1 Detailed Estimate

Service Monthly First 12 months total (USD)
AWS CodeDeploy $8.8 $105.6
Amazon EC2 $1.533 $18.4
Amazon Route 53 $0.4 $4.8
VPN Connection $1.1 $13.2

Detailed-Estimate-img001

5.0 Summary

GitHub Actions + CodeDepoly are powerful DevOps tools that fulfill the principle of “think big, take small steps” in a business environment.

To conclude, let’s summarize the key points of this chapter:

5.1 Principles

  • The new “Macro Portfolio” system is to comply with the “Least Effort Principle”, which includes (1) agile development, and (2) agile deployment
  • The real issues were (1) the project took too long to deploy, and (2) automated deployment was not achieved
  • Success is due to the following: (1) Other departments want small features in small increments. (2) More simplicity means more understanding of the problem’s root cause.

5.2 Action

  • Give the Updated API Manual to other departments to try before every Thursday
  • Simplicity is a good result of the Highest Standards because we performed (1) a “DIVE DEEP investigation” and (2) understanding the root cause of the problem

5.3 AWS DevOps

  • The development engineer commits the code via GitHub Push
  • GitHub Actions trigger workflows
  • IAMROLE_GITHUB_ARN authorizes access to AWS resources
  • GitHub Actions triggers AWS CodeDeploy
  • AWS CodeDeploy triggers deployment to Amazon EC2 instances
  • AWS CodeDeploy pulls Github resources and deploys to Amazon EC2 instances

5.4 AWS IAMCodeDeploy, EC2, Github

  • AWSCodeDeployService-EC2AccessCodeDeployRole-20241024T000000
  • AWSCodeDeployService-DepolyEC2Role-20241024T000000
  • AWSCodeDeployService-GitAssumeRoleWithAction-20241024T000000

5.5 AWS CodeDeploy (Appspec.yml)

  • BeforeInstall
  • BeforeInstall
  • AfterInstall
  • ApplicationStart
  • ValidateService

5.6 Cost

  • Monthly cost: $11.83 (USD)
  • Total 12 months cost: $141.96 (USD)

Postscript

AWSCb-img001On 14 December 2024, I attended the annual Amazon Greater China Community Gathering. I am very thankful to AWS for bringing me an unforgettable experience.

📷Shoot and 🎬Edit by Kenny Chan
Smile-img001Also, thanks to Smile (Lingxi) Lv - Developer Experience Advocacy Program Manager for supporting AWS Community Builder.

cover-image-001

1.0 Preface

I am currently working in a financial technology company that specializes in providing (1) financial trading data and (2) macro-asset allocation solutions. The company is developing a “Macro Portfolio” system to support other departments, such as Macroeconomic Analysis, Trading Systems, Risk Management, Financial Deep Learning, Cybersecurity Engineers, etc. The new “Macro Portfolio” system will be used by the company’s financial services department to support the business of the financial services industry.

The new “Macro Portfolio” system is to comply with the “Least Effort Principle”, which includes (1) agile development and changes to respond to the volatility of the financial markets in the VOCA era, and (2) agile deployment of the project to reduce the time wasted in communication with other departments, and implementation of automation work.

However, the current development engineer (yes, that’s me!) is uncomfortable developing a “macro-portfolio” system across multiple departments. Functional requirements from the macroeconomic analysis department, functional feedback from the risk management department, code changes from the financial deep learning department, and code review from the cybersecurity engineer department.

After two weeks of “DIVE DEEP investigation” and meetings with a “single leader” in each department, the real issues were (1) the project took too long to deploy, and (2) automated deployment was not achieved.

If we can release the functionality in GrayRelease first, and give the Updated API Manual to other departments to try before every Thursday, we can increase the overall project development speed by +30%. In other words, customers will be able to experience the new “Macro Portfolio” functionality in 10 days instead of 13 days.

Therefore, we decided to deploy the Macro Portfolio system using the AWS DevOps pipeline to accelerate the entire Prototype->Development->Deployment->Use->Feedback->Modification project lifecycle.

“Customer Obsession” is matter! – Amazon 16 leadership principles

1.1 Goals of the AWS DevOps Pipeline

Akshay Kapoor

In October 2024, I took a week to read Akshay Kapoor’s [AWS Senior Cloud Infrastructure Architect] AWS DevOps Simplified: Build a solid foundation in AWS to deliver enterprise-grade software solutions at scale. Then I understood what Raymond Tsang [AWS Senior Technical Trainer] told me at the Hong Kong Re: Invent Recap in February 2024 when he said: “There is no absolute right solution, so even if you use only a small portion of AWS services and the result is better, then that’s a good solution.”

Raymond Tsang

Now, I totally agree with Raymond Tsang [AWS Senior Technical Trainer]. This “AWS DevOps Pipeline” architecture was a success in results, and magically, only a few AWS services were used. For example, we didn’t use Instance Auto Scaling, AWS ECS (Elastic Container Service), AWS ELB (Elastic Load Balancing), AWS CloudFormation, etc.

Invent and Simplify” is a matter! – Amazon 16 leadership principles

“**Any damn fool can make it complex. it takes a genius to make it simple.**” – Ray Dalio, Principles

In my experience, success is due to the following: (1) Other departments want small features in small increments, not complete solutions. (2) More simplicity means more understanding of the problem’s root cause. So (3) it’s faster and more efficient to “Deliver Results”, even if it’s just a small portion of AWS services.

Because the financial services industry is specialized, each department is responsible for different goals to help customers get value. Financial DevOps should not be a limitation or obstacle, but rather a way to better serve other departments and customers in different situations.

At the same time, I understood that “Simplify & Insist on the Highest Standards” is not a conflict. Although we simplified the whole project, simplicity is a good result of the Highest Standards because we performed (1) a “DIVE DEEP investigation” and (2) understanding the root cause of the problem.

Although you may not believe it, in emergency situations, we use Excel to calculate the Black-Scholes model, because Excel is the fastest and easiest way to solve emergency problems, and it is also the best for “Customer Obsession” and “Deliver Results”.

1.2 “AWS DevOps Pipeline” Architecture

The services used in the AWS DevOps pipeline:

  1. GitHub Actions
  2. AWS CodeDeploy
  3. Amazon EC2
  4. IAM

AWS DevOps Pipeline Architecture

Walkthrough:

  1. The development engineer commits the code via GitHub Push
  2. GitHub Actions trigger workflows
  3. IAMROLE_GITHUB_ARN authorizes access to AWS resources.
  4. GitHub Actions triggers AWS CodeDeploy
  5. AWS CodeDeploy triggers deployment to Amazon EC2 instances
  6. AWS CodeDeploy pulls Github resources and deploys to Amazon EC2 instances

1.3 Optimization

This architecture is only suitable for Agile delivery and development environments that are currently “running small steps quickly”. If it is used in a production environment, we need to use Instance Auto Scaling, AWS ECS (Elastic Container Service), AWS ELB (Elastic Load Balancing), etc.

In addition, to make it easier for you to understand the “AWS DevOps pipeline” mechanism, in the following tutorials, Python and Backtrader are removed from the application layer, while just a simple Nginx and static web pages are used.

1.4 Applying GenAI Tools - Amazon Q in Financial Services DevOps

Amazon Q is a perfect GenAI Chatbot development tool.

In September 2024, I found an anomalous charge on my AWS bill, but I didn’t know why EC2 EIP became a paid service.

So I asked Amazon Q and in just 10 seconds I knew the answer. The idle EIP is charged.
Developer-Q-in-Financial-Services-DevOps-img001Developer-Q-in-Financial-Services-DevOps-img002

  1. Select EC2 -> Elastic IP addresses -> Network & Security
  2. Select Elastic IPs
  3. Delete the idle EIPs

In addition, I used Amazon Q to learn about AWS DevOps. The following is my experience with Amazon Q while applying the knowledge from AWS Certified Machine Learning - Specialty Certification exam.

Developer-Q-in-Financial-Services-DevOps-img003

Since AWS Pipeline is an AWS-Centric service, integrating GitHub Actions does not meet the Least Effort Principle.

Therefore, AWS Pipeline is not the best approach.

Developer-Q-in-Financial-Services-DevOps-img004I know that AWS Pipeline is AWS-Centric Orchestrates and that it consists of CodeBuild and CodeDeploy.

I asked Amazon Q, knowing that CodeDeploy was the AWS service I needed and would be the best Least Effort Principle solution with GitHub Actions.

Developer-Q-in-Financial-Services-DevOps-img005Reference Articles:

After I read the tutorial on the AWS DevOps blog, it is already very similar to my solution although it is AWS EKS.

Through Amazon Q, I quickly understand the differences and similarities of each AWS service and apply it more productively in my daily work. Therefore, I highly recommend using AI tools for productivity.

1.5 Summary

I shared the current situation in the financial services industry and then applied the AWS 16 Leadership Principles, Akshay Kapoor and Raymond Tsang’s insights on solving business and technical pain points through AWS cloud services.

Finally, summarize the key points of this chapter:

1.5.1 Principles

  • The new “Macro Portfolio” system is to comply with the “Least Effort Principle”, which includes (1) agile development, and (2) agile deployment
  • The real issues were (1) the project took too long to deploy, and (2) automated deployment was not achieved
  • Success is due to the following: (1) Other departments want small features in small increments. (2) More simplicity means more understanding of the problem’s root cause.

1.5.2 Action

  • Give the Updated API Manual to other departments to try before every Thursday
  • Simplicity is a good result of the Highest Standards because we performed (1) a “DIVE DEEP investigation” and (2) understanding the root cause of the problem

1.5.3 AWS DevOps

  • The development engineer commits the code via GitHub Push
  • GitHub Actions trigger workflows
  • IAMROLE_GITHUB_ARN authorizes access to AWS resources
  • GitHub Actions triggers AWS CodeDeploy
  • AWS CodeDeploy triggers deployment to Amazon EC2 instances
  • AWS CodeDeploy pulls Github resources and deploys to Amazon EC2 instances

In the next chapter, I’ll share (1) building an AWS DevOps pipeline, and (2) the estimated cost of AWS cloud services. I hope you all grow together in the AWS community.

Introduction

I am extremely delighted to have participated in the AWS re:Invent re:Cap event held in Hong Kong, which provided me with exposure to the latest AI solutions offered by AWS.

In my previous article, although I discussed deploying deep learning models in production using EC2, such a solution is only suitable for my personal use case, which can be found in the article “Machine Learning Trading Strategy Best Practices for AWS SageMaker“.

In this article, I will first discuss the advantages of deploying models in production using SageMaker after training them locally. I would like to express my gratitude to Raymond Tsang for providing valuable insights.

Next, I will delve into the benefits of training models using SageMaker as opposed to local training. I would like to thank Yanwei CUI for sharing their insights.

Lastly, I will explain a more efficient trading strategy architecture, with special thanks to Wing So for their valuable input.

1. The Benefits of Deploying Models in Production with SageMaker

The greatest advantage of SageMaker lies in its data security, auto scaling, and container deployment capabilities. If high data security, handling sudden traffic spikes, and agile development processes are required, leveraging these advantages of SageMaker can significantly accelerate development and deployment timelines.

However, after training models locally, can one deploy them in production using SageMaker? In other words, is it possible to utilize only specific functionalities of SageMaker?

Answer: Yes, it is possible to use only certain functionalities of SageMaker.

In the case of my use case, “Alice’s Intraday Futures Trading Strategy,” which is a daily trading strategy model with fixed trading times and a predictable number of requests, the model is susceptible to market sentiment and unexpected news events, necessitating monthly model updates.

In such a scenario, deploying the model in a production environment using SageMaker offers the following advantages:

  • SageMaker allows for container deployment, making it easier to manage custom inference code within the deployment image.
  • SageMaker’s endpoint supports version iterations, facilitating agile development processes.
  • SageMaker supports multi-model deployment in a single endpoint, enabling easier management of multiple model interfaces.

While local model training is preferred in my use case, there are still advantages to using SageMaker for model training.

2. The Advantages of Training Models with SageMaker

If there are two RTX3080 graphics cards available on the local server, is there still a need to use AWS SageMaker for training models? In other words, can one replace the pay-as-you-go model training of SageMaker with a one-time higher fixed cost?

Answer: Yes, it is possible. However, if one wishes to avoid the time-consuming process of hardware deployment or simply desires to utilize higher-end hardware for a shorter duration, training models using SageMaker is more suitable.

Furthermore, SageMaker optimizes data-batch processing and floating-point operations to accelerate model training speed.

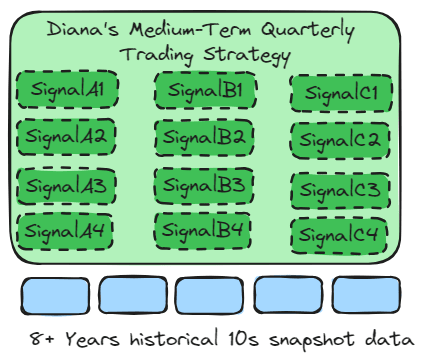
In the case of my use case, “Diana’s Medium-Term Quarterly Trading Strategy,” which involves multi-asset trading in four major markets (US stocks, Hong Kong stocks, US bonds, and USD currency), the optimized data-batch processing of SageMaker can be utilized for the four main markets.

Additionally, the optimized floating-point operations of SageMaker can be applied to the three core technical indicators within the model (high dividend stocks, low volatility, and capital accumulation).

Therefore, gaming graphics cards have limitations when it comes to model training.

3. A More Efficient Trading Strategy Architecture

Whether using EC2 or SageMaker container deployment, both options serve to expedite development time. However, considering the overall efficiency of the trading system, two factors need to be considered: streaming data processing and the layer at which computations are performed.

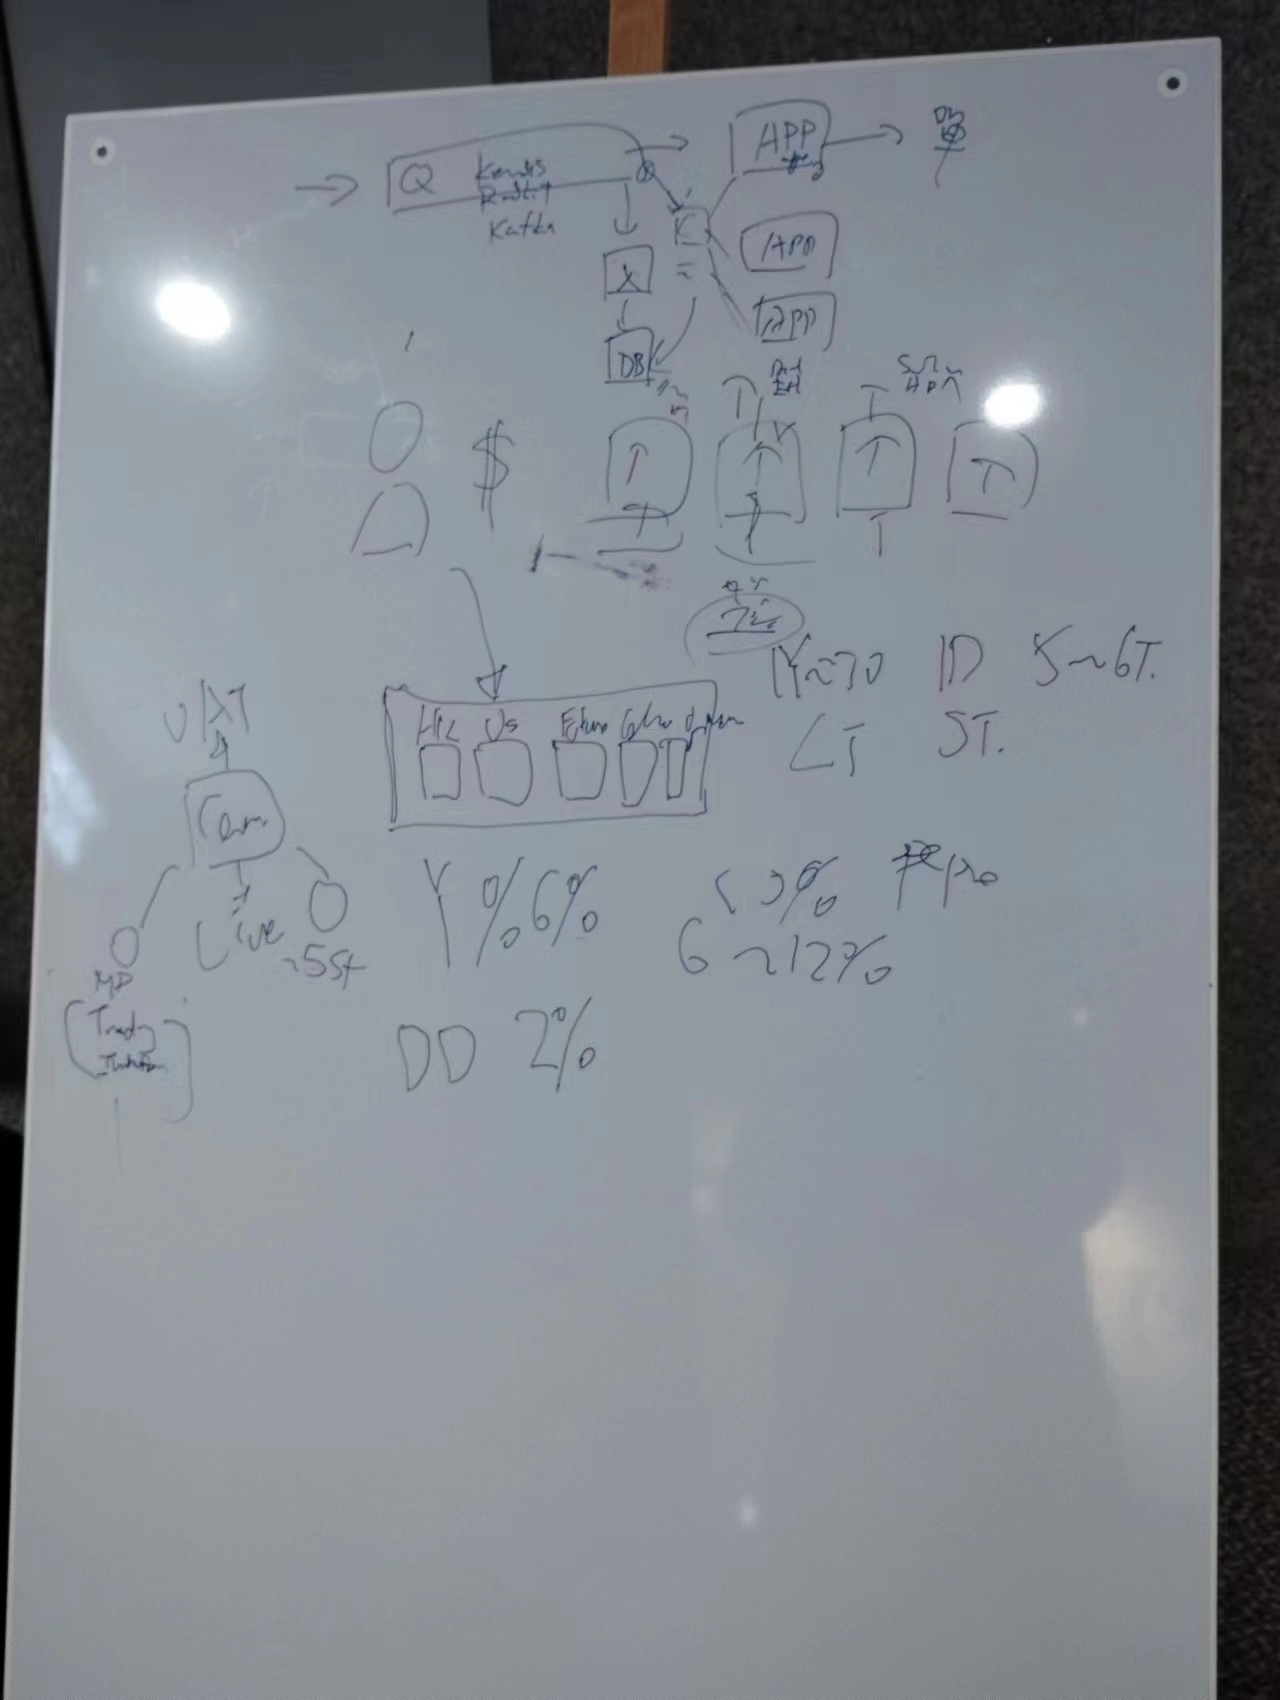
Full Architecture

The key to achieving higher efficiency lies in the Queue layer.

After the Data Provider delivers streaming data, the Queue distributes the data to the Application while simultaneously storing the streaming data in a database. This reduces latency and improves overall efficiency.

Furthermore, performing computations at the Queue layer for the technical indicators used by all Applications prevents redundant calculations and enhances overall efficiency.

However, further investigation is required to determine which Queue framework to use.

Summary

The theme of AWS re:Invent re:Cap, “Gen AI,” was a captivating event. There were many intriguing segments, such as the “Deep Dive Lounge,” “Lighting Talk,” and “Game Jam,” which provided delightful surprises.

Deep Dive LoungeDeep Dive Lounge, Wing So.

More importantly, numerous AWS solution architects have contributed to the advancement of my trading endeavors, offering lower-cost solutions and improved computational efficiency. Lastly, I would like to express my special thanks to Raymond Tsang, Yanwei CUI, and Wing So for their invaluable assistance.

Introduction

In my previous articles, I used two different trading strategies to explain the best practices of batch-transform and real-time endpoints, as well as the reasons for using EC2. These articles can be referred to as “Even though Sagemaker provides various benefits, why do I still use EC2?“ and “Why Choose Sagemaker Despite Having a Local Server with RTX3080?“.

In this article, I will first demonstrate the complete architecture of SageMaker.

Then, I will explain the reasons for using Multi-Modal-Single-Container + Microservices and not using Application Load Balancer.

Finally, I will use two different trading strategies to explain the best practices of data parallelism and model parallelism in advanced training models.

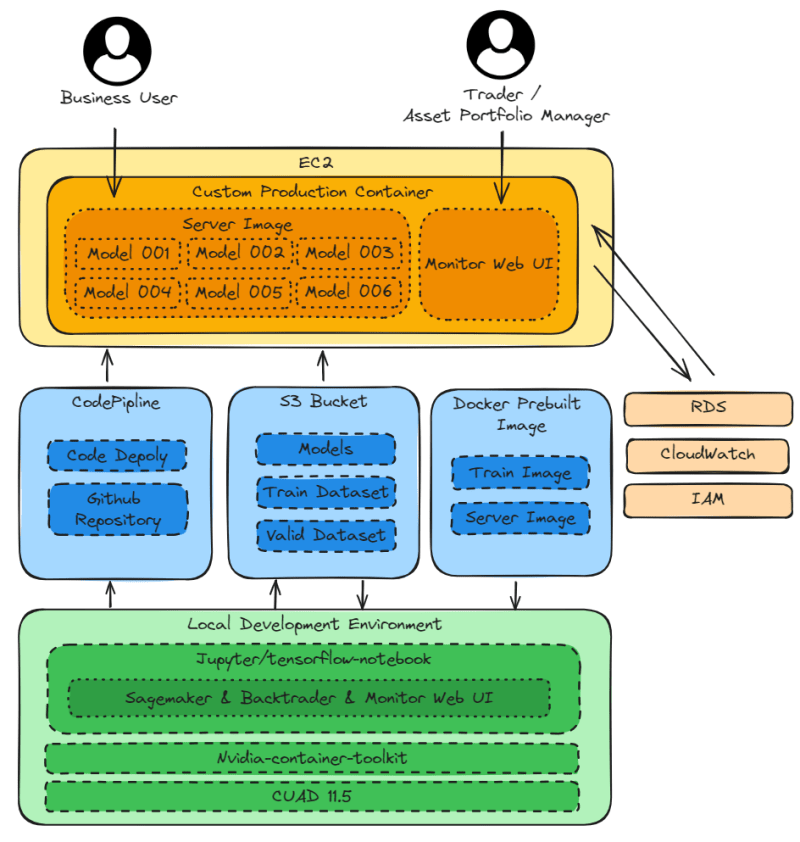
Architecture Overview

Architecture Overview

Local Development Environment

  • CUDA 11.5 and Nvidia-container-toolkit for local model training.
  • jupyter/tensorflow-notebook for local development environment, with libraries required for Sagemaker[local], Backtrader, and Monitor Web UI installed in the image.

Supported AWS services

  • Sagemaker prebuilt images for pulling images to the local development environment for local model training and testing.
  • S3 Bucket for storing datasets and models.
  • CodePipline for deploying projects on Github to EC2 production environment.

EC2

  • Custom Production Container with libraries required for Sagemaker, Backtrader, and Monitor Web UI.
  • Monitor Web UI for presenting the trading performance of the model in graphical form, providing :80 to Trader and Asset Portfolio Manager.
  • Server Image for deploying models using Sagemaker prebuilt image, providing :8080 to business user.

Managed AWS Services

  • RDS for storing model results. Monitor Web UI in EC2 retrieves the data from RDS and presents the trading performance in graphical form.
  • CloudWatch for monitoring the computation and storage of EC2, RDS, and S3 Bucket.
  • IAM for helping jupyter/tensorflow-notebook in local development environment to access Sagemaker prebuilt images and S3 Bucket.

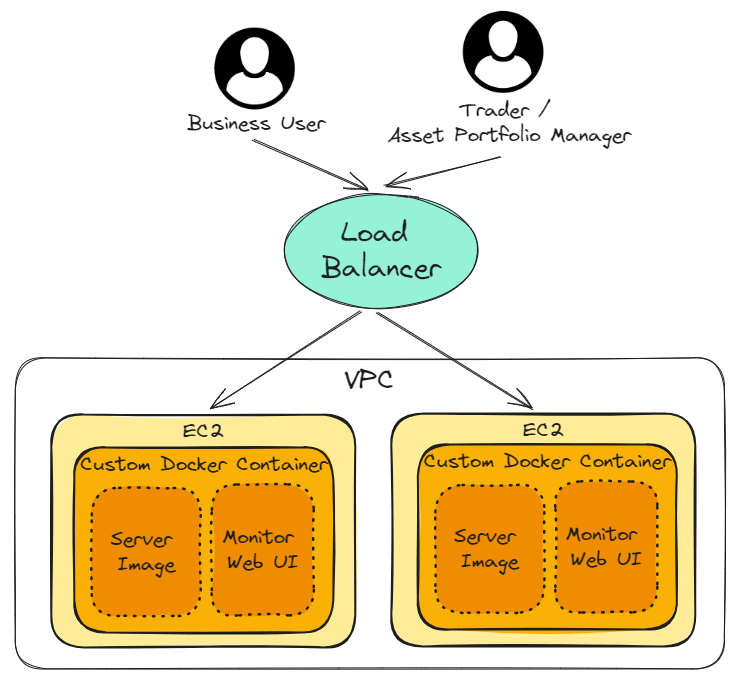
Why not use Application Load Balancer and instead create Multi-Modal-Single-Container + Microservices on EC2 to handle errors?

Application Load Balancer

Application Load Balancer is a remarkable service. In fact, it can also be used to handle errors. However, in the case of trading strategies, I would choose to handle errors with Multi-Modal-Single-Container + Microservices.

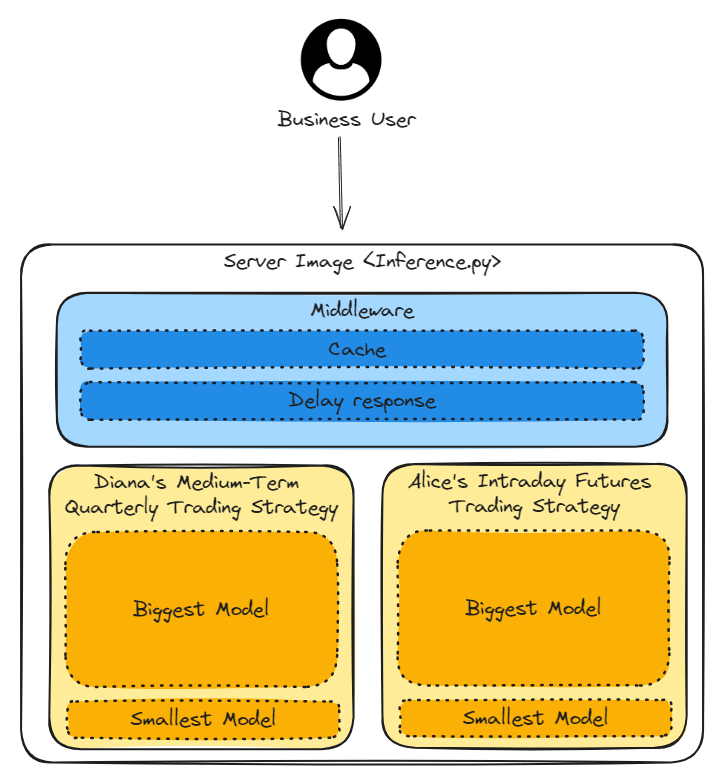
Here are my three error handling methods:

three error handling methods

The goal of the following three error handling methods is to flexibly reduce hardware resource requirements.

1.Switch to Smallest Model

There are two trading strategies (Diana’s medium-term quarterly trading strategy and Alice’s intraday futures trading strategy). Each trading strategy has two versions of the model, where the Biggest Model provides high accuracy but requires high hardware resources. On the contrary, the Smallest Model provides low accuracy but requires low hardware resources.

If the server is in a high computational state, switching to the Smallest Model can reduce the hardware resource requirements and keep the application running smoothly.

2. Response caching results

When the same business user uses the application frequently, returning cached data can avoid overloading hardware resources.

3. Delayed Response time

When hardware resources are overloaded, delaying the response time can release the hardware resources.

Advantages of Multi-Modal-Single-Container + Microservices

Here are my examples of trading strategies to explain the reasons for using Multi-Modal-Single-Container + Microservices.

1.Trading strategies have high fault tolerance

Both trading strategies anticipate reduced profits due to slippage during trading. This design with high fault tolerance can accommodate various hardware issues, such as switching to the Smallest Model, response caching results, and delayed response time.

Additionally, it can handle errors from market makers, such as delayed quotes, partial executions, and wide bid-ask spreads.

2. Shared hardware resources

The frequency and time of use of two trading strategies are different, allowing for full utilization of idle hardware resources.

3. Deployment of trading strategies in different regions

Diana’s medium-term quarterly trading strategy targets global assets. By deploying trading strategies independently in Hong Kong and the United States, the latency can be reduced.

Furthermore, if the hardware in Hong Kong completely stops working, the hardware in the United States can be used to hedge the risk by purchasing short options of overseas ETF.

Best Practices of Data Parallelism and Model Parallelism in Advanced Training Models

Sagemaker provides remarkable advanced training methods: Data parallelism and Model parallelism. I will use two different trading strategies to explain the best practices of data parallelism and model parallelism in advanced training models.

Data parallelism
Data parallelism

Model parallelism
Model parallelism

  • Model Parallelism: A simple method of model parallelism is to explicitly assign layers of the model onto different devices.
  • Data Parallelism: Each individual training process has a copy of the global model but trains it on a unique slice of data in parallel with others.

– Accelerate Deep Learning Workloads with Amazon SageMaker, chapter10

In simple terms, if the data can be divided into small groups, Data parallelism is used. If the model can be divided into small groups, Model parallelism is used.

Alice’s intraday futures trading strategy

Alice's intraday futures trading strategy

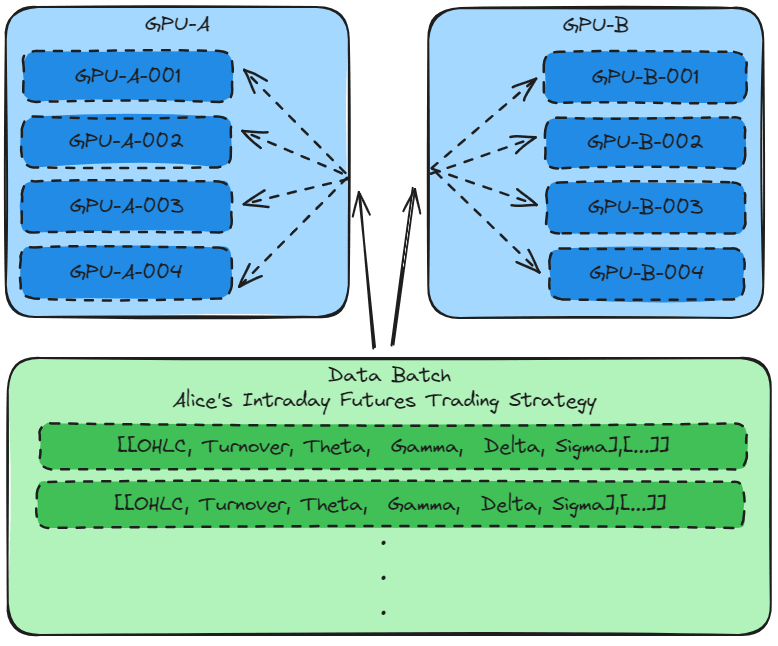
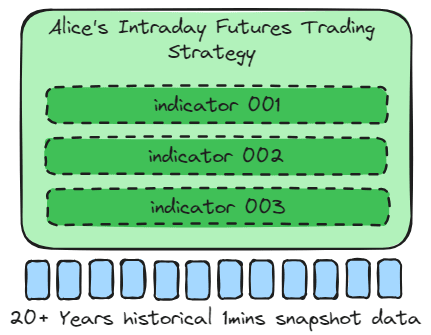
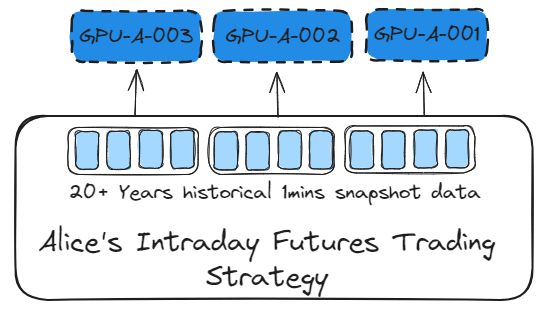
The intraday trading strategy mainly uses a few key indicators to train the model, providing entry and exit points. Therefore, the data samples are large.

Alice's intraday futures trading strategy

When the data sample is large and the model has only a few algorithms, Data parallelism should be used to train the model. This allows the data set to be split and computed on different GPUs.

1
2
3
4
5
6
7
8
distribution = { 
"smdistributed": {
"dataparallel": {
"enabled": True,
"custom_mpi_options": "-verbose -x NCCL_DEBUG=VERSION"
}
}
}

3_SDP_finetuning_pytorch_models.ipynb

Sagemaker provides remarkable advanced training methods. By setting the distribution parameter, Data parallelism can be used to train the model.

Diana’s Medium-Term Quarterly Trading Strategy

Diana's Medium-Term Quarterly Trading Strategy

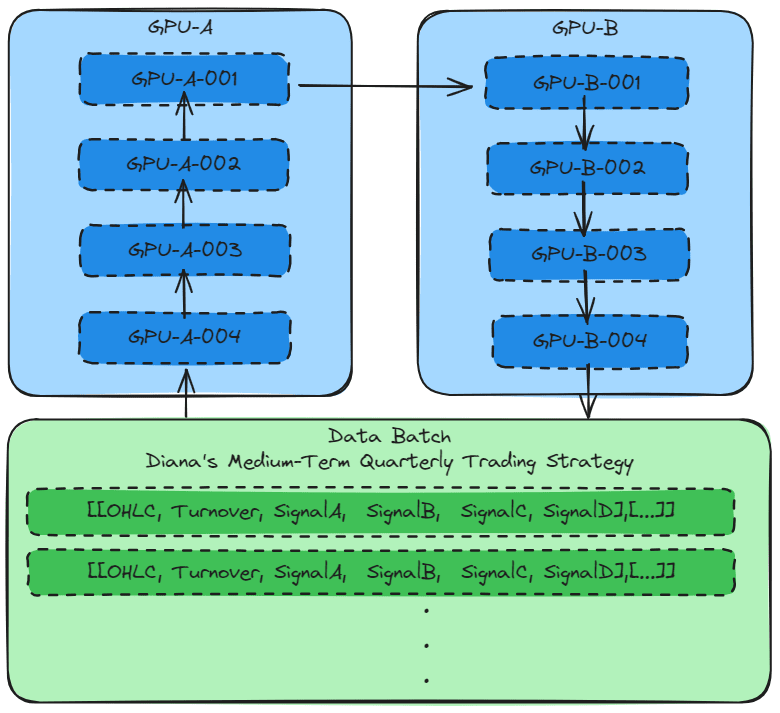
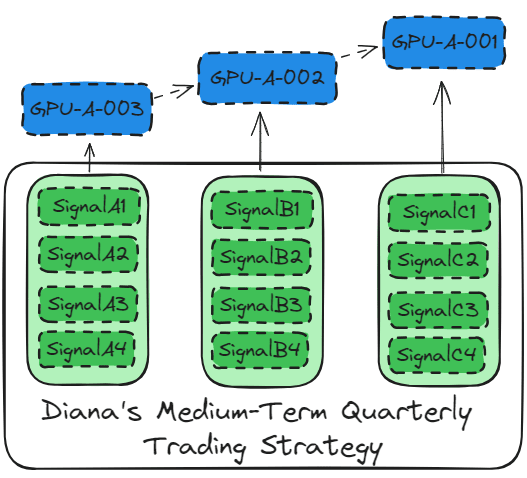
The macro trading strategy mainly uses dozens of key indicators to provide overseas asset allocation forecasts. The minimum data set is 8 years (2 bull and bear cycles) of hourly snapshot data.

Diana's Medium-Term Quarterly Trading Strategy

When the main algorithms can be split into small groups, Model parallelism is used to train the model. This allows the model tensor to be computed in batches on different GPUs.

1
2
3
4
5
6
7
8
9
10
11
12
13
14
15
16
17
18
19
20
21
distribution={
"smdistributed": {
"modelparallel": {
"enabled":True,
"parameters": {
"microbatches": 8,
"placement_strategy": "cluster",
"pipeline": "interleaved",
"optimize": "speed",
"partitions": 2,
"auto_partition": True,
"ddp": True,
}
}
},
"mpi": {
"enabled": True,
"processes_per_host": 1,
"custom_mpi_options": "-verbose -x orte_base_help_aggregate=0"
},
},

3_SDP_finetuning_pytorch_models.ipynb

Similarly, by setting the distribution parameter, Model parallelism can be used to train the model.

Conclusion

AWS provides convenient solutions for the financial industry. Sagemaker seamlessly integrates deep learning workflow into production environments. Additionally, Sagemaker offers surprising features to accelerate development. I will continue to learn about new AWS products and share examples of AWS services in finance and trading.

Introduction

In the previous article, I explained the benefits of using Sagemaker for training models on a local server, which can be found in the article “Why Choose Sagemaker Despite Having a Local Server with RTX3080?“.

In this article, I will first present a simple example to demonstrate the process of training and deploying models locally using Sagemaker.

Then, I will share my experience with a LSTM futures trading project to explain the best practices for using real-time endpoints and batch-transform endpoints.

Finally, based on my experience with the LSTM futures trading project, I will explain which Sagemaker Instance / Fargate / EC2 should be selected for deployment.

Sagemaker Exec - Training and Deploying Models Locally

Sagemaker Exec - Training and Deploying Models Locally

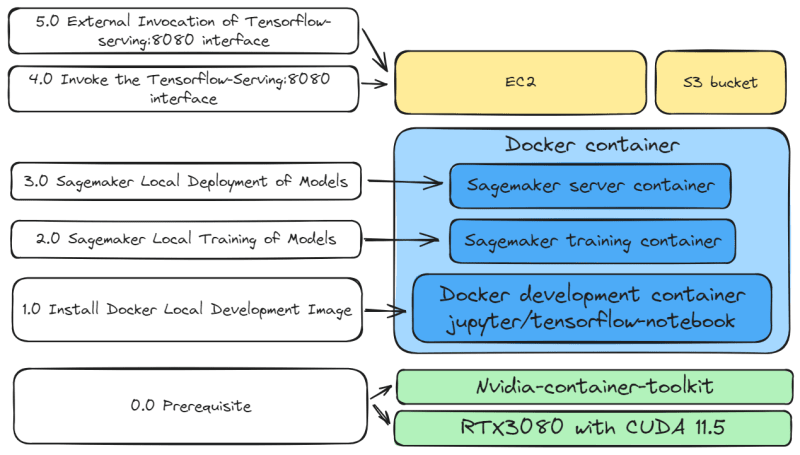
0.0 Prerequisite:
Before starting local development, please install the following:

1.0 Install Docker Local Development Image

1
2
3
4
5
6
7
8
9
10
11
12
13
14
15
16
17
18
19
20
21
22
23
24
25
26
27
28
29
30
31
32
33
34
35
36
37
38
39
40
41
# Copyright (c) Jupyter Development Team.
# Distributed under the terms of the Modified BSD License.
ARG REGISTRY=quay.io
ARG OWNER=jupyter
ARG BASE_CONTAINER=$REGISTRY/$OWNER/scipy-notebook
FROM $BASE_CONTAINER

USER root

LABEL maintainer="Jupyter Project <jupyter@googlegroups.com>"

RUN apt-get -y update && apt-get install -y --no-install-recommends \
ca-certificates \
curl \
gnupg
RUN install -m 0755 -d /etc/apt/keyrings
RUN curl -fsSL https://download.docker.com/linux/ubuntu/gpg | sudo gpg --dearmor -o /etc/apt/keyrings/docker.gpg
RUN chmod a+r /etc/apt/keyrings/docker.gpg
RUN echo \
"deb [arch=$(dpkg --print-architecture) signed-by=/etc/apt/keyrings/docker.gpg] https://download.docker.com/linux/ubuntu \
$(. /etc/os-release && echo "$VERSION_CODENAME") stable" | \
sudo tee /etc/apt/sources.list.d/docker.list > /dev/null
RUN apt-get update
RUN apt-get install -y \
docker-ce \
docker-ce-cli \
containerd.io \
docker-buildx-plugin \
docker-compose-plugin

# Fix: https://github.com/hadolint/hadolint/wiki/DL4006
# Fix: https://github.com/koalaman/shellcheck/wiki/SC3014
SHELL ["/bin/bash", "-o", "pipefail", "-c"]

# Install Tensorflow with pip
RUN pip install --no-cache-dir tensorflow[and-cuda] && \
fix-permissions "${CONDA_DIR}" && \
fix-permissions "/home/${NB_USER}"

# Install sagemaker-python-sdk with pip
RUN pip install --no-cache-dir 'sagemaker[local]' --upgrade

1.1 Use the jupyter/tensorflow-notebook development environment
(https://github.com/jupyter/docker-stacks/blob/main/images/tensorflow-notebook/Dockerfile)
1.2 Modify the jupyter/tensorflow-notebook image to install docker and sagemaker[local] inside the image

1
docker build -t sagemaker/local:0.1 .

1.3 Create the local development image

1
sudo docker run --privileged --name jupyter.sagemaker.001 --gpus all -e GRANT_SUDO=yes --user root --network host -it -v /home/jovyan/work:/home/jovyan/work -v /sagemaker:/sagemaker -v /var/run/docker.sock:/var/run/docker.sock -v /tmp:/tmp -v /sagemaker:/sagemaker sagemaker/local:0.2 >> /home/jovyan/work/log/sagemaker_local_date +\%Y\%m\%d_\%H\%M\%S.log 2

1.4 Start the local development image
1.5 -v /home/jovyan/work, this is the default path for jupyter/tensorflow-notebook
1.6 -v /var/run/docker.sock, used to start the Sagemaker’s train & inference image
1.7 -v /tmp, this is the temporary file path for Sagemaker
1.8 Go to 127.0.0.1:8888

2.0 Sagemaker Local Training of Models

1
2
3
4
5
6
import os
os.environ['AWS_DEFAULT_REGION'] = 'AWS_DEFAULT_REGION'
os.environ['AWS_ACCESS_KEY_ID'] = 'AWS_ACCESS_KEY_ID'
os.environ['AWS_SECRET_ACCESS_KEY'] = 'AWS_SECRET_ACCESS_KEY'
os.environ['AWS_ROLE'] = 'AWS_ROLE'
os.environ['INSTANCE_TYPE'] = 'local_gpu'

2.1 Set AWS IAM and INSTANCE_TYPE

1
2
3
4
5
6
7
8
import keras
import numpy as np
from keras.datasets import fashion_mnist

(x_train, y_train), (x_val, y_val) = fashion_mnist.load_data()
os.makedirs("./data", exist_ok = True)
np.savez('./data/training', image=x_train, label=y_train)
np.savez('./data/validation', image=x_val, label=y_val)

2.2 Download datasets (training set and validation set)

1
2
3
4
5
6
7
8
9
10
11
12
13
14
15
16
17
18
from sagemaker.tensorflow import TensorFlow

training = 'file://data'
validation = 'file://data'
output = 'file:///tmp'

tf_estimator = TensorFlow(entry_point='fmnist.py',
source_dir='./src',
role=os.environ['AWS_ROLE'],
instance_count=1,
instance_type=os.environ['INSTANCE_TYPE'],
framework_version='2.11',
py_version='py39',
hyperparameters={'epochs': 10},
output_path=output,
)

tf_estimator.fit({'training': training, 'validation': validation})

2.3 Download fmnist.py and model.py to ./src
(https://github.com/PacktPublishing/Learn-Amazon-SageMaker-second-edition/tree/main/Chapter%2007/tf)
2.4 Start local training of models. Sagemaker launches the image 763104351884.dkr.ecr.us-east-1.amazonaws.com/tensorflow-training:2.11-gpu-py39.

3.0 Sagemaker Local Deployment of Models

1
2
3
4
5
6
7
8
9
10
11
12
13
14
15
import os
from sagemaker.tensorflow import TensorFlowModel

model = TensorFlowModel(
entry_point='inference.py',
source_dir='./src',
role=os.environ['AWS_ROLE'],
model_data=f'{output}/model.tar.gz',
framework_version='2.11'
)

predictor = model.deploy(
initial_instance_count=1,
instance_type=os.environ['INSTANCE_TYPE'],
)

3.1 Download inference.py to ./src
(https://github.com/aws/sagemaker-tensorflow-serving-container/blob/master/test/resources/examples/test1/inference.py)
3.2 Create the Tensorflow-serving image. Sagemaker launches the image 763104351884.dkr.ecr.us-east-1.amazonaws.com/tensorflow-inference:2.11-gpu

4.0 Invoke the Tensorflow-Serving:8080 interface

1
2
3
4
5
6
7
8
9
10
11
12
13
14
15
16
import random
import json
import matplotlib.pyplot as plt

num_samples = 10
indices = random.sample(range(x_val.shape[0] - 1), num_samples)
images = x_val[indices]/255
labels = y_val[indices]

for i in range(num_samples):
plt.subplot(1,num_samples,i+1)
plt.imshow(images[i].reshape(28, 28), cmap='gray')
plt.title(labels[i])
plt.axis('off')

payload = images.reshape(num_samples, 28, 28, 1)

Download datasets
4.1 Download datasets

1
2
3
4
response = predictor.predict(payload)
prediction = np.array(response['predictions'])
predicted_label = prediction.argmax(axis=1)
print('Predicted labels are: {}'.format(predicted_label))

4.2 Run the model

1
2
print('About to delete the endpoint')
predictor.delete_endpoint(predictor.endpoint_name)

4.3 Close the Tensorflow-serving image

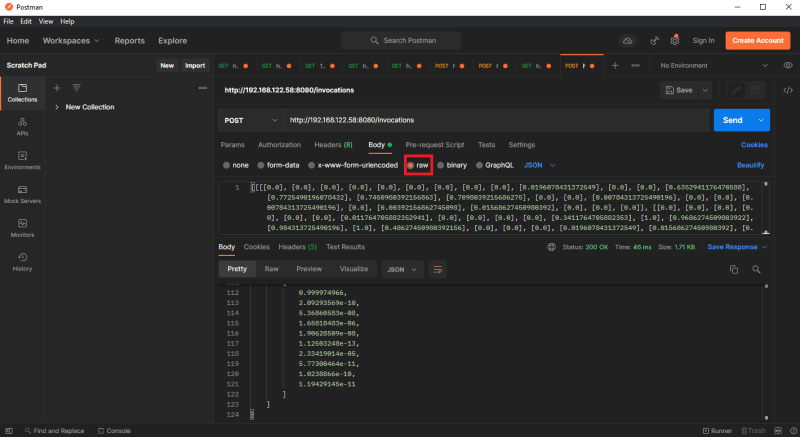
5.0 External Invocation of Tensorflow-serving:8080 interface

External Invocation of Tensorflow-serving:8080 interface
5.1 Go to the real-time endpoint (http://YOUR-SEGAMAKER-DOMAIN:8080/invocations)
5.2 [Post] Body -> raw, input json data

Conclusion of Sagemaker Exec

This is a simple example demonstrating the process of training and deploying models locally using Sagemaker. As mentioned earlier, since Sagemaker does not fully support local development, it is necessary to modify the jupyter/tensorflow-notebook image. Additionally, a more complex inference.py is required for local model deployment.

However, I still recommend using Sagemaker for local development because it provides pre-built resources and clean code. Moreover, Sagemaker has preconfigured workflows for training and deploying model images, so we do not need to deeply understand the project structure and internal operations to complete the training and deployment of models.

When to use real-time endpoints and batch-transform endpoints

The choice of endpoint depends not only on cost factors but also on business logic, such as response time, frequency of Invocation, dataset size, model update frequency, error tolerance, etc. I will present two practical use cases to explain the best use of real-time endpoints and batch-transform endpoints.

  • SageMaker batch transform is designed to perform batch inference at scale and is cost-effective.
  • SageMaker real-time endpoints aim to provide a robust live hosting option for your ML use cases.

Getting-Started-with-Amazon-SageMaker-Studio, chapter07

Here are two examples of trading strategy:

1. Diana’s medium-term quarterly trading strategy
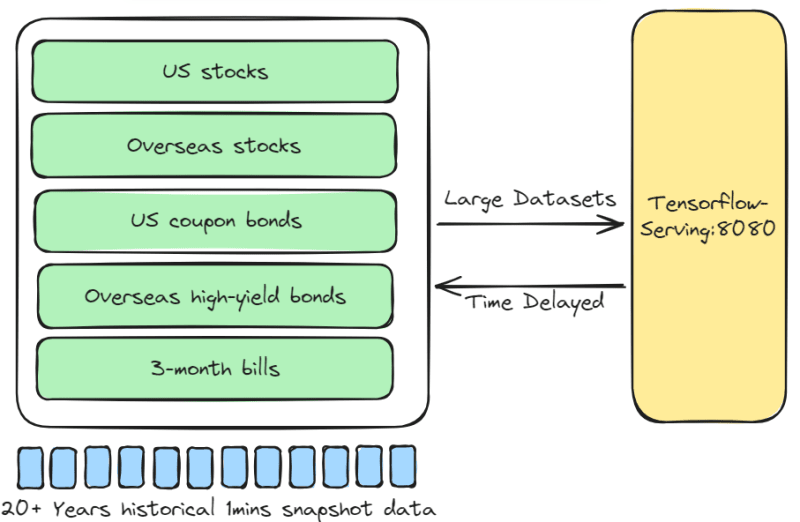
The multi-asset portfolio includes US stocks, overseas stocks, US coupon bonds, overseas high-yield bonds, and 3-month bills. Every 3 months, the LSTM-all-weather-portfolio model is used for asset rebalancing. This model runs once a day, 15 minutes before market close, to check the risk of each position and whether the portfolio meets the 5% annualized return.

2. Alice’s intraday futures trading strategy
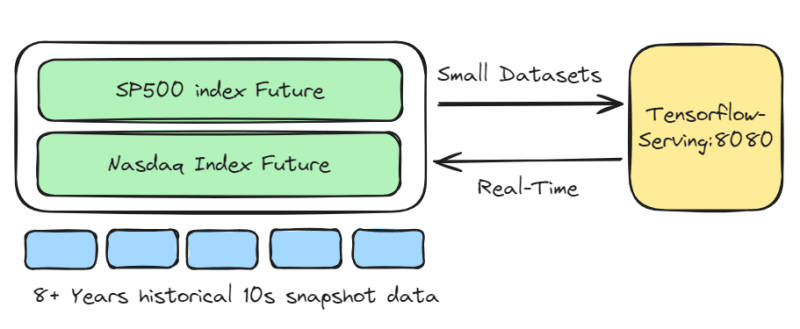
Trading only S&P 500 index and Nasdaq index futures, with a holding period of approximately 30 minutes to 360 minutes. The LSTM-Pure-Alpha-Future model uses 20-second snapshot data to provide buy and exit signals. These signals are stored for daily performance analysis of the model.


Diana’s Medium-Term Quarterly Trading Strategy

  • Assets: Stocks, Bonds, Bills
  • Instrument Pool: US stocks, Overseas stocks, US coupon bonds, Overseas high-yield bonds, 3-month bills
  • Trading Frequency: 5 trades per quarter
  • Response Time: Time Delayed. Only required 15 minutes before market close
  • Model: LSTM-all-weather-portfolio
  • Model Update Frequency: Low. Update the model only if it achieves a 5% annualized return
  • Recommended Solution: Batch-transform endpoint

Batch-transform endpoint

If the dataset is large and response time can be delayed, the Batch-transform endpoint should be used.

Alice’s Intraday Futures Trading Strategy

  • Assets: Index Futures
  • Instrument Pool: SP500 index Future, Nasdaq Index Future
  • Trading Frequency: 5 trades per day
  • Response Time: Real-time
  • Model: LSTM-Pure-Alpha-Future
  • Model Update Frequency: High. Always optimization of buy and exit signals
  • Recommended Solution: Real-time endpoint

Real-time endpoint

If the dataset is small and response time needs to be fast, the Real-time endpoint should be used.


Even though Sagemaker provides various deployment benefits, why do I still use EC2?

In my current role at a financial technology company, I am always excited about innovative products. AWS’s innovative products bring surprising solutions. If I were to create a personal music brand, I would choose AWS’s new products such as DeepComposer, Fargate, Amplify, Lambda, etc.

However, the cost of migrating to the cloud is high. Additionally, there is no significant incentive to migrate existing hardware resources to the cloud. Here are my use cases to explain why I choose EC2:

Even though Sagemaker provides various deployment benefits, why do I still use EC2?

1. Custom Python financial engineering library

Although I prefer to use frameworks and libraries, there are some special requirements that require the use of a custom Python financial engineering library, such as developing high dividend investment strategies, macro cross-market analysis, and so on. Therefore, I manage Docker images. Thus, the pre-built images provided by Sagemaker cannot fully meet my needs, and instead, EC2 offers more freedom to structure the production environment.

2. Team development and custom CI/CD workflow

Although Sagemaker allows for quick training and deployment of models, it does not fully meet my development needs. We have an independent development team responsible for researching trading strategies and developing deep learning trading models. Due to our custom CI/CD workflow, it is not suitable to overly rely on Sagemaker for architecture.

3. Pursuit of controlled fixed costs

Although Sagemaker and Fargate allow for quick creation of instances, the cost is based on CPU utilization. Therefore, I prefer EC2 with fixed costs and manually scale up when resources are insufficient.

Conclusion

Sagemaker is a remarkable product. For startup companies looking to launch new products, AWS’s cloud solution is the preferred choice. Even for mature enterprises, leveraging AWS cloud services can optimize workflow. In summary, I highly recommend incorporating Sagemaker into the development process.

If I have a local server with an RTX3080 and 64GB of memory, do I still need AWS Sagemaker? The answer is: yes, there is still a need.

benefits and drawbacks

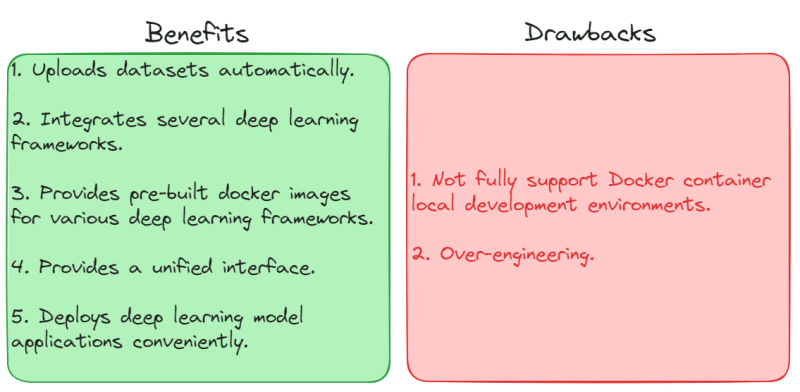
Although the hardware level of the local server is good, Sagemaker provides additional benefits that are particularly suitable for team development processes. These benefits include:

  1. Sagemaker automatically uploads datasets (training set, validation set) to S3 buckets, with a timestamp suffix each time a model is trained. This makes it easy to manage data sources during a long-term development process.

  2. Sagemaker integrates several popular deep learning frameworks, such as TensorFlow and XGBoost. This ensures code consistency.

  3. Sagemaker provides pre-built docker images for various deep learning frameworks, including training images and server images, which accelerate local development time.

  4. The inference.py in Sagemaker’s server image ensures a unified interface specification for models. Code consistency and simplicity are crucial in team development.

  5. Sagemaker itself is a cloud service, making it convenient to deploy deep learning model applications.

However, Sagemaker has some drawbacks when it comes to training and deploying models locally. These drawbacks include:

  1. Sagemaker does not fully support Docker container local development environments. In other words, using the jupyter/tensorflow-notebook image to develop Sagemaker sometimes generates minor issues. I will discuss this in more detail below.

  2. Over-engineering. Honestly, although I am a supporter of Occam’s Razor and prefer solving practical problems with the simplest code, setting up Sagemaker on a local server can be somewhat over-engineered in terms of infrastructure.

In summary, for long-term team development, it is necessary to spend time setting up Sagemaker locally in the short term.

How to decide whether to set up Sagemaker on a local server?

I referred to the method in the AWS official documentation to quickly let you know whether Sagemaker should be set up on a local server or not.
https://docs.aws.amazon.com/sagemaker/latest/dg/docker-containers.html

How to decide whether to set up Sagemaker on a local server?

1. Do you use multiple deep learning frameworks?
No -> Use AWS cloud-based Sagemaker service. Maintain code simplicity and consistency.
Yes -> Go to question 2.

2. Is it team development?
No -> Use AWS cloud-based Sagemaker service. Automatically upload datasets and manage data versions.
Yes -> Go to question 3.

3. Is it long-term development?
No -> Use a local server. Save costs for long-term usage. However, AWS cloud-based services may not be necessary. It is recommended to use a local server with a graphics card.
Yes -> Go to question 4.

4. Is it deploying applications in the cloud?
No -> Use a local server.
Yes -> Set up Sagemaker on a local server. Efficiently utilize both the local server and AWS cloud-based services.

Local Server Architecture

Local Server Architecture

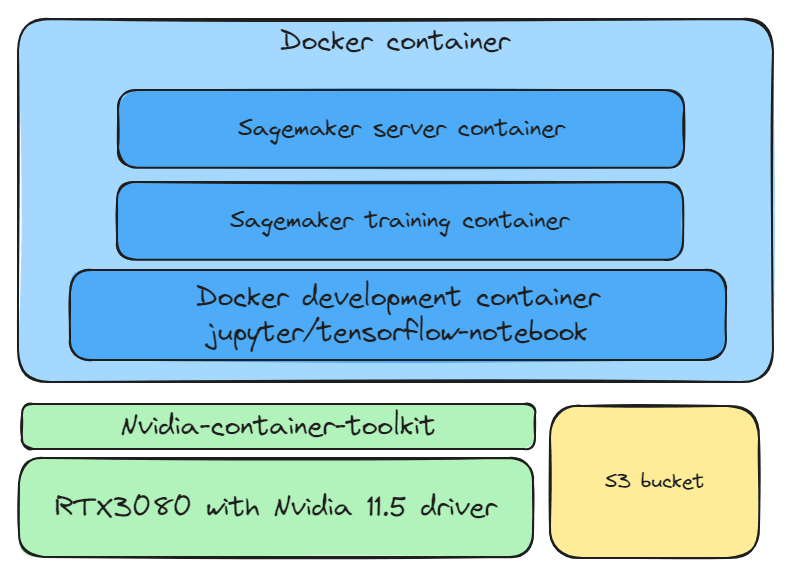
  1. Nvidia 11.5 driver. RTX3080 is required for both training and deploying models.

  2. Nvidia-container-toolkit, connecting Docker images with Nvidia 11.5 driver.

  3. Docker development container environment, jupyter/tensorflow-notebook. Use Sagemaker to develop TensorFlow deep learning models.

  4. Sagemaker training image. Sagemaker uses pre-built images to train models, automatically selecting suitable images for Nvidia, Python, and TensorFlow. Since I use TensorFlow, I use 763104351884.dkr.ecr.us-east-1.amazonaws.com/tensorflow-training:2.11-gpu-py39.

  5. Sagemaker server image. Sagemaker uses pre-built images to deploy models. This server image utilizes TensorFlow-serving (https://github.com/tensorflow/serving) and Sagemaker’s inference for model deployment. Since I use TensorFlow, I use 763104351884.dkr.ecr.us-east-1.amazonaws.com/tensorflow-inference:2.11-gpu.

  6. S3 bucket. Used to centrally manage datasets and model versions.

Useful Tips

Although these tips are very basic, in fast iteration cycles and team development, simple and practical tips can make development smoother and more efficient.

Clear naming
As the project develops over time, the number of dataset and model versions increases. Therefore, clear file naming conventions help maintain development efficiency.

1. Prefix

{Project Name}-{Model Type}-{Solution}

Whether it’s a dataset, model, or any temporary .csv file, it is best to have clear names to avoid forgetting the source and purpose of those files. Here are some examples of naming conventions I use.

{futurePredict}-{lstm}-{t5}
{futurePredict}-{train}-{hloc}
{futurePredict}-{valid}-{hloc}

2. Suffix

{Version Number}-{Timestamp}

After each model training, there are often new ideas. For example, when optimizing a LSTM model used for stock trading strategies by adding new momentum indicators, I would add this optimization approach to the suffix.

{volSignal}-{20240106_130400}

If there are no specific updates, generally, I use numbers to represent the current version.

{a.1}-{20240106_130400}

3. Clear project structure

./data/input

Datasets inputted into the model.

./data/output

Model outputs.

./data/tmp

All temporary files. In fast iteration cycles, it is common to lose temporary files, leading to a loss of data source traceability. Therefore, temporary files also need to be well managed.

./model

Location for storing models. Generally, Sagemaker automatically manages datasets and models, but it is still recommended to store them locally for convenient team development.

./src

Supporting libraries, such as Sagemaker’s inference.py, and common toolkits for model training.

Practical Experience: Why Sagemaker Does Not Fully Support Local Docker Container Development

The support of Sagemaker for local development is not very favorable. Below are two local development issues that I have encountered. Although I have found similar issues raised on Github, there is still no satisfactory solution available at present.

1. Issue with local container Tensorflow-Jupyter development environment

When training models, Sagemaker displays an error regarding the docker container (No /opt/ml/input/config/resourceconfig.json).

The main reason is that after executing estimator.fit(...), Sagemaker’s Training image reads temporary files in the /tmp path. However, Sagemaker does not consider the local container Tensorflow-Jupyter. As a result, these temporary files in /tmp are only available in the local container Tensorflow-Jupyter, causing errors when the Training image of Sagemaker tries to read them.

Here is the solution I provided:
https://github.com/aws/sagemaker-pytorch-training-toolkit/issues/106#issuecomment-1862233669

solution

Solution: When launching the local container Tensorflow-Jupyter, add the "-v /tmp:/tmp" command to link the local container’s /tmp with the local /tmp, which solves this problem.

Here is the code I used to launch the local container:
sudo docker run --privileged --name jupyter.sagemaker.001 --gpus all -e GRANT_SUDO=yes --user root --network host -it -v /home/jovyan/work:/home/jovyan/work -v /sagemaker:/sagemaker -v /var/run/docker.sock:/var/run/docker.sock -v /tmp:/tmp -v /sagemaker:/sagemaker sagemaker/local:0.2 >> /home/jovyan/work/log/sagemaker_local_date +\%Y\%m\%d_\%H\%M\%S.log 2

2. Issue with Sagemaker’s local server image
Sagemaker’s local server image defaults to using the inference method for deployment, so there is no inference.py in the server image. Therefore, model.fit(...) followed by model.deploy(...) results in errors.

The error messages are not clear either. Sometimes, it displays "/ping" error, and other times, "No such file or directory: 'inference.py'" error.

Here is the solution I provided:
https://github.com/aws/sagemaker-python-sdk/issues/4007#issuecomment-1878176052

solution

Solution: Save the model after model.deploy(...). Then, use sagemaker.tensorflow.TensorFlowModel(...) to reload the model and reference ./src/inference.py.

Although the inference method is a more convoluted way to locally deploy models, it is useful for adding middleware business logic on the server side and is a very valuable local deployment approach.

Summary

I know that Sagemaker’s cloud service offers many amazing services, such as preprocessing data, batch training, Sagemaker-TensorBoard, and more. For developers who need to quickly prototype, these magical services are perfect for them.

Although setting up Sagemaker architecture on a local server may be more complex, Sagemaker provides standardized structure, automated processes, integrated unified interfaces, and pre-built resources. In the long run, I recommend setting up Sagemaker on a local server.