Introduction
In the previous article, I explained the benefits of using Sagemaker for training models on a local server, which can be found in the article “Why Choose Sagemaker Despite Having a Local Server with RTX3080?“.
In this article, I will first present a simple example to demonstrate the process of training and deploying models locally using Sagemaker.
Then, I will share my experience with a LSTM futures trading project to explain the best practices for using real-time endpoints and batch-transform endpoints.
Finally, based on my experience with the LSTM futures trading project, I will explain which Sagemaker Instance / Fargate / EC2 should be selected for deployment.
Sagemaker Exec - Training and Deploying Models Locally

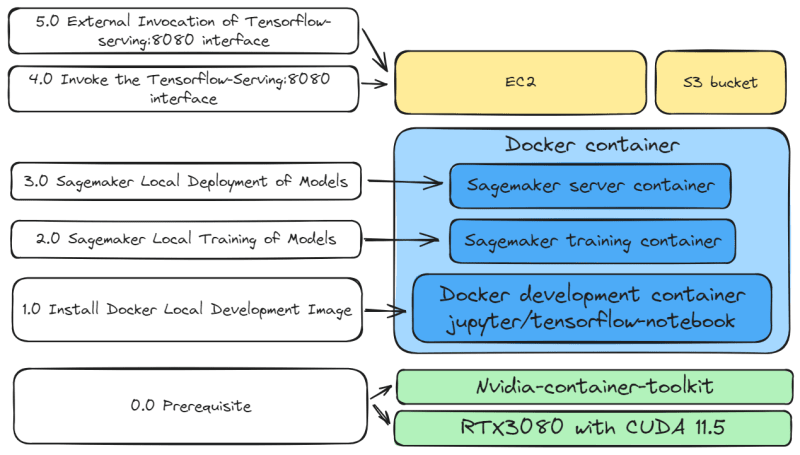
0.0 Prerequisite:
Before starting local development, please install the following:
- Nvidia CUDA (https://developer.nvidia.com/cuda-downloads)
- Nvidia-container-toolkit (https://github.com/NVIDIA/nvidia-container-toolkit)
- Docker (https://docs.docker.com/engine/install/)
1.0 Install Docker Local Development Image
1 | # Copyright (c) Jupyter Development Team. |
1.1 Use the jupyter/tensorflow-notebook development environment
(https://github.com/jupyter/docker-stacks/blob/main/images/tensorflow-notebook/Dockerfile)
1.2 Modify the jupyter/tensorflow-notebook image to install docker and sagemaker[local] inside the image
1 | docker build -t sagemaker/local:0.1 . |
1.3 Create the local development image
1 | sudo docker run --privileged --name jupyter.sagemaker.001 --gpus all -e GRANT_SUDO=yes --user root --network host -it -v /home/jovyan/work:/home/jovyan/work -v /sagemaker:/sagemaker -v /var/run/docker.sock:/var/run/docker.sock -v /tmp:/tmp -v /sagemaker:/sagemaker sagemaker/local:0.2 >> /home/jovyan/work/log/sagemaker_local_date +\%Y\%m\%d_\%H\%M\%S.log 2 |
1.4 Start the local development image
1.5 -v /home/jovyan/work, this is the default path for jupyter/tensorflow-notebook
1.6 -v /var/run/docker.sock, used to start the Sagemaker’s train & inference image
1.7 -v /tmp, this is the temporary file path for Sagemaker
1.8 Go to 127.0.0.1:8888
2.0 Sagemaker Local Training of Models
1 | import os |
2.1 Set AWS IAM and INSTANCE_TYPE
1 | import keras |
2.2 Download datasets (training set and validation set)
1 | from sagemaker.tensorflow import TensorFlow |
2.3 Download fmnist.py and model.py to ./src
(https://github.com/PacktPublishing/Learn-Amazon-SageMaker-second-edition/tree/main/Chapter%2007/tf)
2.4 Start local training of models. Sagemaker launches the image 763104351884.dkr.ecr.us-east-1.amazonaws.com/tensorflow-training:2.11-gpu-py39.
3.0 Sagemaker Local Deployment of Models
1 | import os |
3.1 Download inference.py to ./src
(https://github.com/aws/sagemaker-tensorflow-serving-container/blob/master/test/resources/examples/test1/inference.py)
3.2 Create the Tensorflow-serving image. Sagemaker launches the image 763104351884.dkr.ecr.us-east-1.amazonaws.com/tensorflow-inference:2.11-gpu
4.0 Invoke the Tensorflow-Serving:8080 interface
1 | import random |

4.1 Download datasets
1 | response = predictor.predict(payload) |
4.2 Run the model
1 | print('About to delete the endpoint') |
4.3 Close the Tensorflow-serving image
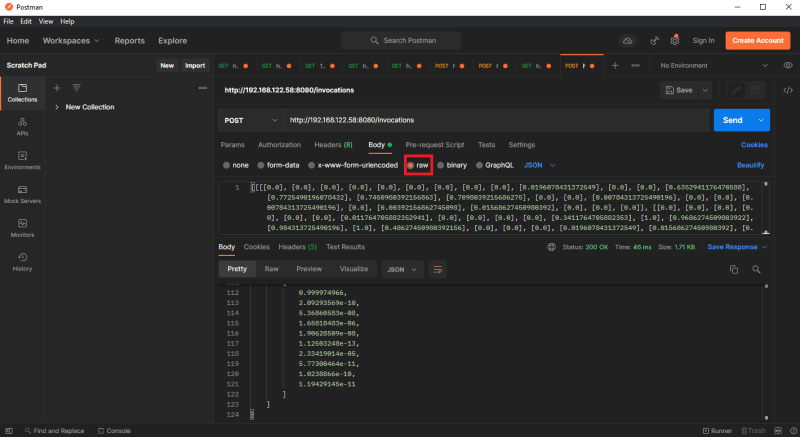
5.0 External Invocation of Tensorflow-serving:8080 interface

5.1 Go to the real-time endpoint (http://YOUR-SEGAMAKER-DOMAIN:8080/invocations)
5.2 [Post] Body -> raw, input json data
Conclusion of Sagemaker Exec
This is a simple example demonstrating the process of training and deploying models locally using Sagemaker. As mentioned earlier, since Sagemaker does not fully support local development, it is necessary to modify the jupyter/tensorflow-notebook image. Additionally, a more complex inference.py is required for local model deployment.
However, I still recommend using Sagemaker for local development because it provides pre-built resources and clean code. Moreover, Sagemaker has preconfigured workflows for training and deploying model images, so we do not need to deeply understand the project structure and internal operations to complete the training and deployment of models.
When to use real-time endpoints and batch-transform endpoints
The choice of endpoint depends not only on cost factors but also on business logic, such as response time, frequency of Invocation, dataset size, model update frequency, error tolerance, etc. I will present two practical use cases to explain the best use of real-time endpoints and batch-transform endpoints.
- SageMaker batch transform is designed to perform batch inference at scale and is cost-effective.
- SageMaker real-time endpoints aim to provide a robust live hosting option for your ML use cases.
Getting-Started-with-Amazon-SageMaker-Studio, chapter07
Here are two examples of trading strategy:
1. Diana’s medium-term quarterly trading strategy
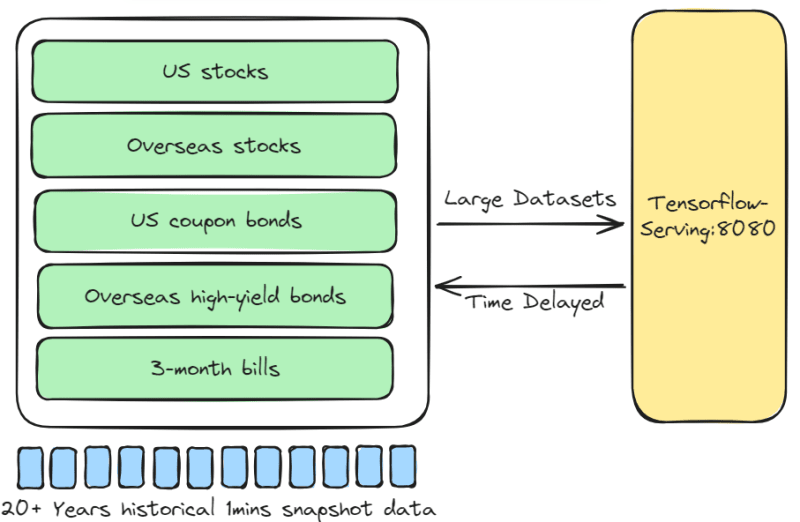
The multi-asset portfolio includes US stocks, overseas stocks, US coupon bonds, overseas high-yield bonds, and 3-month bills. Every 3 months, the LSTM-all-weather-portfolio model is used for asset rebalancing. This model runs once a day, 15 minutes before market close, to check the risk of each position and whether the portfolio meets the 5% annualized return.
2. Alice’s intraday futures trading strategy
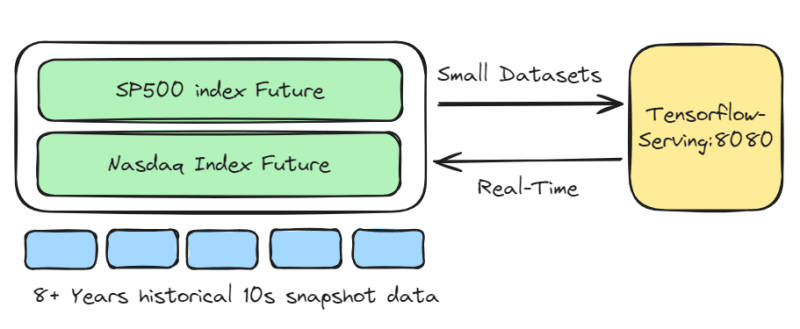
Trading only S&P 500 index and Nasdaq index futures, with a holding period of approximately 30 minutes to 360 minutes. The LSTM-Pure-Alpha-Future model uses 20-second snapshot data to provide buy and exit signals. These signals are stored for daily performance analysis of the model.
Diana’s Medium-Term Quarterly Trading Strategy
- Assets: Stocks, Bonds, Bills
- Instrument Pool: US stocks, Overseas stocks, US coupon bonds, Overseas high-yield bonds, 3-month bills
- Trading Frequency: 5 trades per quarter
- Response Time: Time Delayed. Only required 15 minutes before market close
- Model: LSTM-all-weather-portfolio
- Model Update Frequency: Low. Update the model only if it achieves a 5% annualized return
- Recommended Solution:
Batch-transform endpoint

If the dataset is large and response time can be delayed, the Batch-transform endpoint should be used.
Alice’s Intraday Futures Trading Strategy
- Assets: Index Futures
- Instrument Pool: SP500 index Future, Nasdaq Index Future
- Trading Frequency: 5 trades per day
- Response Time: Real-time
- Model: LSTM-Pure-Alpha-Future
- Model Update Frequency: High. Always optimization of buy and exit signals
- Recommended Solution:
Real-time endpoint

If the dataset is small and response time needs to be fast, the Real-time endpoint should be used.
Even though Sagemaker provides various deployment benefits, why do I still use EC2?
In my current role at a financial technology company, I am always excited about innovative products. AWS’s innovative products bring surprising solutions. If I were to create a personal music brand, I would choose AWS’s new products such as DeepComposer, Fargate, Amplify, Lambda, etc.
However, the cost of migrating to the cloud is high. Additionally, there is no significant incentive to migrate existing hardware resources to the cloud. Here are my use cases to explain why I choose EC2:

1. Custom Python financial engineering library
Although I prefer to use frameworks and libraries, there are some special requirements that require the use of a custom Python financial engineering library, such as developing high dividend investment strategies, macro cross-market analysis, and so on. Therefore, I manage Docker images. Thus, the pre-built images provided by Sagemaker cannot fully meet my needs, and instead, EC2 offers more freedom to structure the production environment.
2. Team development and custom CI/CD workflow
Although Sagemaker allows for quick training and deployment of models, it does not fully meet my development needs. We have an independent development team responsible for researching trading strategies and developing deep learning trading models. Due to our custom CI/CD workflow, it is not suitable to overly rely on Sagemaker for architecture.
3. Pursuit of controlled fixed costs
Although Sagemaker and Fargate allow for quick creation of instances, the cost is based on CPU utilization. Therefore, I prefer EC2 with fixed costs and manually scale up when resources are insufficient.
Conclusion
Sagemaker is a remarkable product. For startup companies looking to launch new products, AWS’s cloud solution is the preferred choice. Even for mature enterprises, leveraging AWS cloud services can optimize workflow. In summary, I highly recommend incorporating Sagemaker into the development process.